Hello! :]

Showing posts with label eyeliner. Show all posts

Thursday, November 24, 2011

Eyeliner 101 & Tutorial

Note: This is a remake of my old "Basic Eyelining Post" because the old one the picture quality was terrible and I didn't give enough information.

Why Eyeliner?
To me eyeliner is the most important step in my makeup routine because it helps define my eyes and give me the appearance of looking awake. If I was late for work and have very little time to put on makeup I would only put on concealer and eyeliner and I'm out the door. Besides defining the eyes their are people who put on a thin line of eyeliner to make the lashes appear fuller and thicker. Eyeliner can also be a statement and give a type of look and personality, for example someone can have a heavy dark liner to give it a rocker look or a cat eye liner to give it a fierce look.


Left eye is with liner and right eye is without

Click on the thumbnails for tutorials


Working with your eye shape
Most people would apply eyeliner depending on their eye shape. I've seen mono-lids would apply a very thick liner on upper lashes so when they look up the liner is still visible and make the eye appear bigger. While those with bigger eyes would apply a thinner liner on the top and bottom lids to make the eyes appear slightly smaller. To me however you chose to line your eyes is all up to you, you don't necessary have to follow the rules, play around with your liner and see what suits you the most.

Types of Eyeliners

1) Pencil/Retractable Pencil: These are the easiest to line your eyes with however don't expect them to be smudge/fade proof or last all day. However these are great if you want a smokey look, simply after your apply the pencil liner get a smudger or pencil brush and smudge the liner into a gradient effect.
Recommended Brands: Revlon ColorStay, Milani Liquif'eye, Urban Decay 24/7, Maybelline Eye StudioMaster Drama, Makeup Forever Pencil Aqua Eyes

2) Liquid Pen/Marker: Another easiest liner to line your eyes because it's like a pen form. These usually last longer then the pencil liner because it's in a liquid form. My only con is just like a regular marker these do dry up over time because of the felt tip. To get every drop of the product it's recommend to store these upside down in a cup so all the liquid is on the felt tip.
Recommended Brands: Physicians Formula Eye Booster, Milani Eye Tech

3) Liquid: These liners usually comes in a thin brush and a ink-well so to get the product you would dip the brush in the well. Unlike the pencil and pen liners these are usually a little more difficult to apply because majority of these liners comes with a very thin brush but with practice these should be a piece of cake. Since its a liquid formula lasting power is usually long but drying time takes a little longer.
Recommended Brands: L'oreal Lineur Intense, Maybelline Line Stiletto, Revlon Colorstay, Makeup Forever Liquid Aqua Eyes

4) Gel: These come in little pots and similar to the liquid you will need a brush to get the product and most of them don't come with a brush (except drugstore brands). It dries a little faster then the liquid and the texture is buttery soft it glides on pretty smooth. Gel liners usually don't fade and crease that much throughout the day.
Recommended Brands: Mac Fluidline, Essence Gel Liner, Maybelline Studio Gel Liner

5) Cream: Similar concept as the gel liner however overtime these do dry out faster in the pot so the texture can get hard. Otherwise when applied these dry faster on the lids so you don't have to wait in the morning.
Recommended Brand: Wet n' Wild Cream Liner, Physicians Formula Shimmer Strips Custom Eye Enhancing, Stila Smudge Pot

Now if you ask me what kind I prefer I would have to say Gel and Liquid base liners only because these usually last the longest on my oily lids.

Color Liners
Color liners is another great way to give your eyes a pop of color or to enhance your natural eye color. I think color liners are very fun and great for summer.


Tutorial
I will show you how I typically line my eyes every morning, it takes me no more then a minute to apply both eyes because I only apply them on my upper lash line and I don't tight-line anymore like I use to.

Step 1) Apply a eyeshadow base all over the lid, I'm using Too Faced Shadow Insurance, this will help everything on your lid to last all day without fading or creasing.


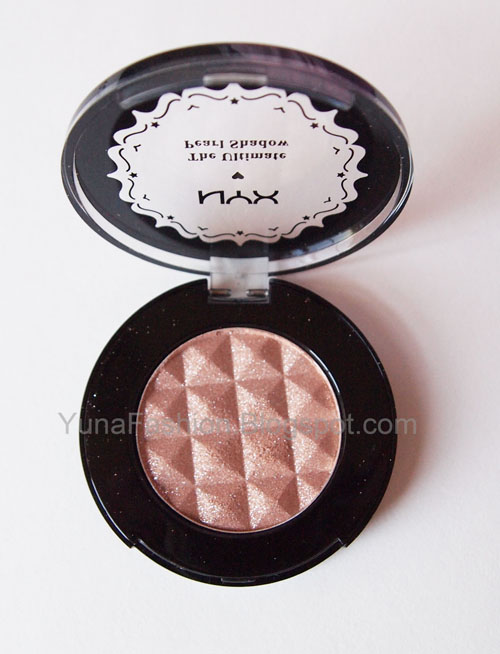
Step 2) Apply a eyeshadow of your choice, I'm using a shimmery nude eyeshadow from NYX. If you have oily lids like mine it's highly recommend you apply a powdery eyeshadow to prevent eyeliners from transferring to your upper lids.

Step 3)
I'll be using Mac Fluidline gel liner and a tiny angle brush from Loew Cornell which is a painting brush but I find this brush so much easier to use then a regular eyeliner brushes, just make sure the bristles are soft.


For me the easiest way to apply is by holding a handheld mirror, look down at it while your other hand holding brush and then apply. If you have shaky hands I recommend you rest your elbow (the one holing the brush) on the table.


Step 4 First I start in the middle of my lid and then glide it down to the inner corner.


Step 5 I do the same for the other side.


Step 6) For my bottom line I usually apply only a matte brown eyeshadow instead of a liner to give it a more natural look. Here I'm using Revlon Matte Shadow in "Rich Sable".


Once you're done you may set the liner with a black eyeshadow or a translucent face power if you want it to last all day.

Whatever eyeliner you pick out and style you choose to do is all up to you, I hope you find this post helpful and if you have any questions you may drop them in my comments section or email me at aniyuna@yahoo.com.

Thank you for reading!

Disclaimer: Everything used in this tutorial is purchase by me and I'm not affiliated or sponsored and did not get paid to mention any of the products in this post, it's all my own opinion.

Sunday, November 7, 2010

Review: Maybelline Line Stiletto

Price: $5-$6
Where to Buy: Any Drugstores


What Maybelline Says:
* A liquid liner that allows you the ultimate control to create any line you want!
* Elongates your lash line to shape and define eyes like never before.
* Our flexible felt tip glides on smoothly for the most precise control.
* No tugging. No dragging.
* All day wear up to 8 hours

My Review:
I remember reading a review about this eyeliner in someone's blog a while ago and thought it looked so much like the L'oreal Lineur Intense but didn't get around to purchasing it until Ulta had a Buy One Get One Free deal so I took advantage of that.

After using it for a month I have to say this is IDENTICAL to L'oreal Lineur Intense, so pretty much this review would be the same as the L'oreal one I did, Click Here to Read.

The difference is the the length of the brush handle which the L'oreal is longer and also the price the Maybelline retails for $5-$6 as the L'oreal retails for $8-$9.


Otherwise everything else is the same, sponge tip applicator, both have a shiny dark black finish and the amount of product is also the same, both .05 fl oz.


Lasting power is the same and just like the L'oreal it won't do good for the waterline.

Now if you're wondering which one I would rather repurchase again? I would say the Maybelline because its definitely much cheaper!

This week Rite Aid is having a 40% off all Maybelline products so give this eyeliner a try if you like L'oreal Lineur Intense.

Rating 5/5
Would I repurchase?: yes

Disclaimer:
This is purchase by my own money. Any opinions that I may have expressed in this post are from my own personal experience with the product. I have no affiliation with the company that makes it and did not receive money mentioning or using it. Visit my FAQ & Disclaimer page for more info.


.

Friday, September 24, 2010

Review: ELF Waterproof Eyeliner Pen


Price: $1.00
Where to Buy?: Select Target or ELF website

What ELF says:
Get no smudge with no-budge eyeliner, which creates a fabulous and fresh look of precision that lasts for hours. The smooth pen applicator easily glides on color for very fine to bold lines for effortless beauty.

My Review:
Every time ELF have a coupon code sale online this is one of items I overlook because I have a impression that this wasn't a good eyeliner due to the price. My Target never have any ELF stuffs but I went to the Target close to my BF's place and found a set of 3 liners for $3 which is $1 each and thought why not since its there and I don't have to pay for shipping.

The first time I tried it out I didn't like it at all because there's barely any pigmentation so I threw it in my purse and forgot about for weeks then one day in the car I lost my beloved L'oreal Lineur Intense and I search in my purse and found the ELF liner instead and thought I give it another try. The second time the pigmentation was perfect, I should known that felt-tip liners takes a few application to get the amount out right when you first purchase it. Right after work the liner was still the same as if I just applied it that morning and no transfer on the top lid, I was really impressed!

The only minor problem was the smudging in my inner-corner because I yawn a lot. Other then that this is a great liner for the price keep in mind that I did apply a primer before using the liner so I'm not sure how it would stay without it.

Would this replace my L'oreal Lineur Intense? I would still say no because its still not pigmented enough and I feel that the application isn't smooth.

This is still a great liner for beginners, someone whose new to liquid liners or touch ups.


Smudge Test


Still the same!


With Water:


As you can see the brown liner completely disappeared whereas the black is lighten

Once again for the price its definitely a good purchase and great for touch-ups.

Rating: 5/5
Would I buy this again?: yes

Disclaimer:
This is purchase by my own money. Any opinions that I may have expressed in this post are from my own personal experience with the product. I have no affiliation with the company that makes it and did not receive money mentioning or using it. Visit my FAQ & Disclaimer page for more info.

.
.

Monday, August 9, 2010

Tutorial: Color Liners Using Eyeshadows

Here's a easy tutorial using eyeshadows as color liners. A great way to try out colorful liners without having to buy the liners.

Finish Look:


What I used:

1) A bright blue eyeshadow and a hot pink shadow, I will be using a palette I got from ebay, you can also use the famous 88 eyeshadow palette.
2) Translucent face powder or a nude eyeshadow
3) Water
4) Thin eyeliner brush, this is actually a angle paint brush that I got from a craft store

Tutorial:


Apply eyeshadow primer all over the lid


Apply a translucent powder all over the lid to give a even skin tone color on the lids also if you have monolids this will help prevent the eyeshadow from transferring to the top lid.


dampen the brush with water, this will intensify the eyeshadow and make them into liners.


Apply both the blue on the top lid and pink on the bottom.

and Finish!


Thank you for reading!

Dislcaimer:
All items used in this tutorial is purchase by my own money. Any opinions that I may have expressed in this post are from my own personal experience with the product. I have no affiliation with these company that makes it and did not receive money mentioning or using it. Visit my FAQ & Disclaimer page for more info.

ad