Hello! :]

Showing posts with label 2ne1 x Etude. Show all posts

Friday, July 23, 2010

2NE1 x Etude Tutorial: CL

This look is very bold, I personally wouldn't wear this out but there are ways to make it more wearable like not applying eyeliner on the inner corner.

Original Look:


My Duplicate:


What I used:

1) Too Faced Eyeshadow Primer
2) Rimmel Pencil Eyeliner
3) MAC Gel Liner
4) Eyelash Glue
5) MAC eyeshadow in "Nehru"
6) Eyelash Curler
7) False Lashes

Tutorial:


With a black pencil liner I apply the top lid first


With a black liquid or gel liner I deepen the black


With the pencil liner again I line the bottom rim


Deepen the black again with a gel or liquid liner. Add liner to the inner corner, for a wearable look I would skip this step.


Now add a fish tail flick on the outer corner this step may take some practice to do.


With some oil-free makeup remover on a cotton swap clean out any mistakes or smudges and make the lines more define.


With any matte black eyeshadow set the liner so it will last longer.

Add false lashes and curl them.

and Finish!


Thank you for reading!

Disclaimer:
All items used in this tutorial is purchase by my own money. Any opinions that I may have expressed in this post are from my own personal experience with the product. I have no affiliation with these company that makes it and did not receive money mentioning or using it. Visit my FAQ & Disclaimer page for more info.

.
.

Thursday, July 22, 2010

2NE1 x Etude Tutorial: Minzy

Minzy's look was really fun to do but it did took some time.

Original:


My Duplicate:


What I used:


1) Eyelash Glue
2) CoverGirl eyeshadow in "Turquoise Tempest"
3) Bourjois pencil liner
4) a Teal liner from Urban Decay
5) Eyelash Curler
6) Prestige eyeshadow in "Glitz"
7) False Lashes
8) MAC eyeshadow in Nehru
9) Too Faced eyeshadow primer

Tutorial:


Apply eyeshadow primer all over the lid so the eye makeup will last all day


With a black pencil liner apply a black "V" shape on the outer corner.


Now fill half of the corner with the pencil


With a small brush blend the black liner and still keep it half of the lid.


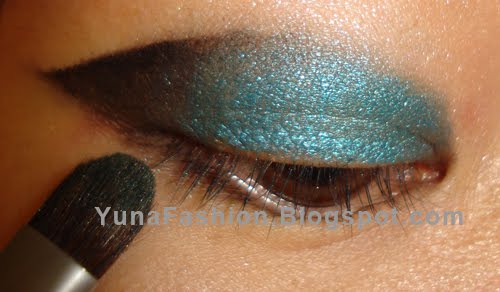
With a teal pencil liner go ahead and fill the rest of the lid.


Apply a teal eyeshadow over the teal liner to blend.


With a matte black eyeshadow apply over the black pencil liner from earlier and blend.


With the black pencil liner again apply a little on the outer corner and blend it with the small brush again.


Apply a gold eyeshadow on the inner corner lid.

Curl and apply false lashes.

Finish!


Thank you for reading!

Disclaimer:
All items used in this tutorial is purchase by my own money. Any opinions that I may have expressed in this post are from my own personal experience with the product. I have no affiliation with these company that makes it and did not receive money mentioning or using it. Visit my FAQ & Disclaimer page for more info.

.
.

Tuesday, July 20, 2010

2NE1 x Etude Tutorial: Dara

Dara's look was actually easy to do, its a simple thick cat eye liner look with a pop of blue color on the lower line, I can see myself wearing this look out day or night.

If you read my old post "Dara Inspire Eyelining" its very similar.

Original Look:


My Duplicate:


What I used:

1) Two Faced Eyeshadow Primer
2) DUO eyelash glue
3) False Lashes
4) Wet n' Wild Cream Liner
5) Victoria Secret eyeliner in the color "Aqua"
6) Urban Decay 24/7 black liner
7) Eyeliner Brush
8) Eyelash Curler

Tutorial:


Apply a eyeshadow primer all over the lid so the eye makeup will last all day.


Apply a pencil liner on the top and bottom lid. Its okay if its not black enough because we will go over it with a liquid liner. Working with the pencil liner first will help to see how you want the thickness of the liner.


Now go over it and darken the black with a cream liner and add a dramatic flick at the end.


Apply any turquoise color liner on the bottom


Curl and apply false lashes, Dara is wearing dramatic lashes and currently I don't have any so I'm using natural ones for now

and Finish!


Thank you for reading!


Disclaimer:
All items used in this tutorial is purchase by my own money. Any opinions that I may have expressed in this post are from my own personal experience with the product. I have no affiliation with these company that makes it and did not receive money mentioning or using it. Visit my FAQ & Disclaimer page for more info.
.
.

ad